Instructions for extended-release oxalic acid
Extended-release oxalic acid for varroa management
This method of application of oxalic acid is not yet approved by the EPA, so the instructions below are intended only for researchers having Pesticide Research Authorizations, Experimental Use Permits, or other permissions from their State Lead Agencies.
FYI, the EPA does not require an Experimental Use Permit to test OAE on a limited number of hives, but your state may require you to do so. Check with your State Lead Agency.
I have been researching OAE for some years now, always under a PRA, and am continuing to improve the method. The information below is only a “current report” on an application method that has to date shown the best efficacy and least adverse effects. This year (2023) I’m testing 18 different methods of application.
Safety
Although oxalic acid is not as reactive as stronger mineral acids, it can still cause eye damage, and if left on the skin, tissue damage. Always wear safety glasses and waterproof gloves during preparation, and be careful to avoid splashing.
Always keep a jug of baking soda solution at hand! (10 heaping tablespoons of baking soda per gallon of water).
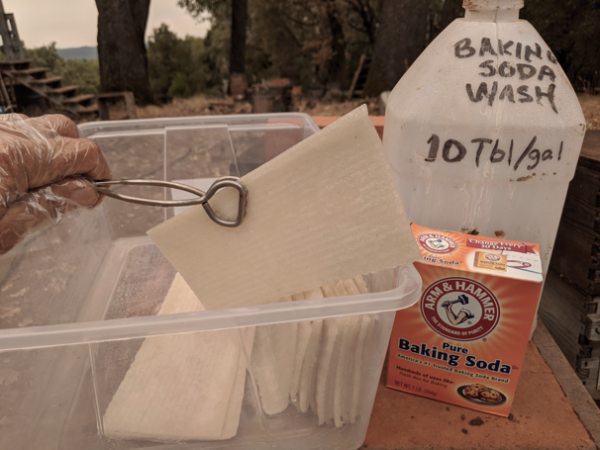
After preparation or application, wash your hands and equipment with soap and warm water to remove any acid residues, or better yet, neutralize any acid on hands, hive tools, or smoker with the baking soda solution, which will immediately neutralize any acids.
After preparation or use of oxalic acid, I always taste my fingers to see whether there are any acid residues on them. If there are, they will taste sour like lemonade. Wash or neutralize them before touching anything else (door handles, your eyes or nose, or taking a leak).
Dosage and delivery matrices
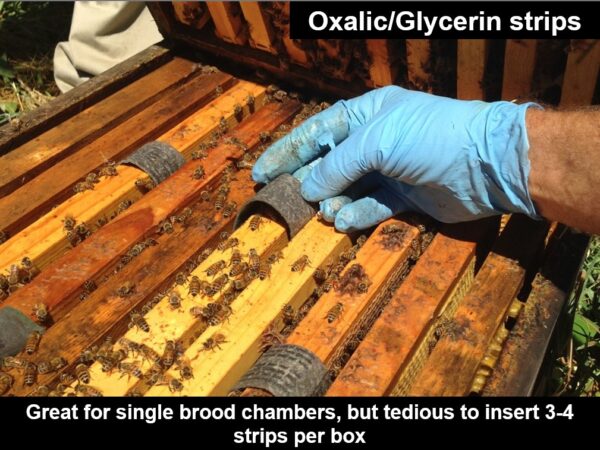
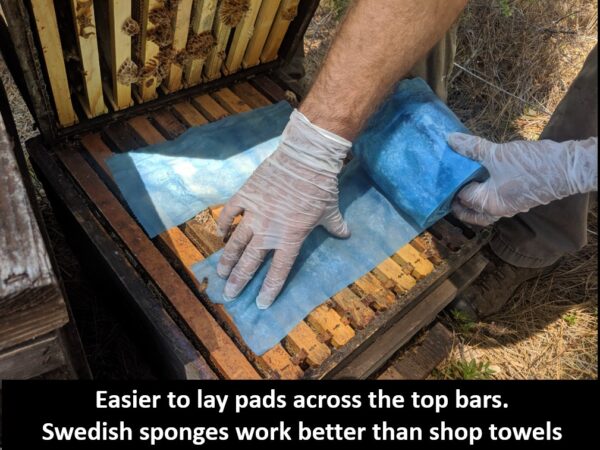
For extended-release application of oxalic acid, it can be dissolved into glycerin, and applied to the hive by either laying pads across the top bars (if applied between two brood chambers), or by hanging strips over the top bars, extending down into the interspaces between the frames. The delivery strips or pads must be applied so that bees freely contact the surfaces.
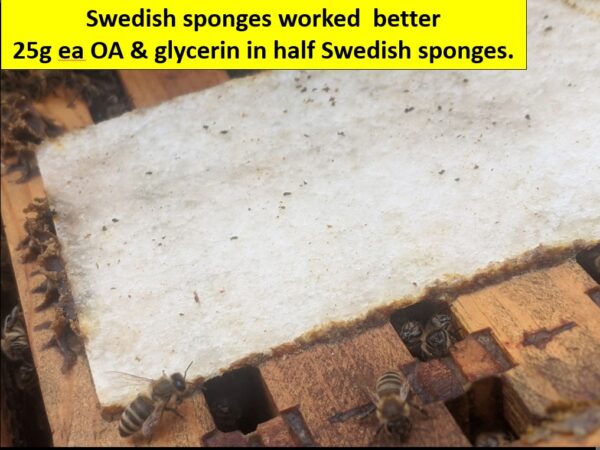
Biodegradable cellulose matrices such as cardboard (chipboard), Swedish sponges, or cotton absorbent fabrics may be used. For full efficacy, roughly 55 – 60 square inches (365 cm2) of delivery matrix must be used if applied across the top bars, or 100 square inches (645 cm2) if hung between the frames. The instructions below are for moisturizer-free Swedish sponges, which hold 100 g of 1:1 (weight to weight) solution of oxalic acid dihydrate to glycerin. Other matrices, or different ratios of acid to glycerin, will require different preparation.
Preparation
For extended-release application, oxalic acid can be dissolved in glycerin, absorbed into any number of absorbent matrices. Field data suggest that for a double-deep hive, there should be roughly 60 square inches of matrix, holding roughly 100 g of 1:1 OA:glycerin (weight to weight), although other ratios may be used (the higher the ratio of glycerin, the more rapidly the OA is dispersed upon the bees, sometimes with adverse effects). For cardboard strips to be hung over the top bars, it will require more total surface area to hold the same amount of solution.
To prepare enough Swedish sponge pads to treat 10 full-sized colonies in double deep boxes (one full sponge per hive):
- First prepare the sponges by cutting them in half (into 3½” x 8” pads), each half of which will absorb 50 grams of the solution (50 g oxalic acid dose per hive).
- Wear safety glasses and waterproof gloves when preparing the solution. Have a neutralizing solution of 10 heaping tablespoons of baking soda dissolved in 1 gallon of water on hand, to neutralize any spills.
- Place 500g OA dihydrate into a stainless steel pan (for 20 sponge halves), then add 500g (400 mL) vegetable glycerin (add the glycerin second in order to avoid splashing of the solution).
- Place the pan over a low/medium heat (preferably using a double boiler), and heat the ingredients while closely monitoring the temperature, not to exceed 160°F (70°C) (the acid crystals will dissolve at as low as 110°F, and start to bubble if the temperature exceeds 170°F).
- Occasionally stir gently until the acid crystals are completely dissolved and the solution is completely clear. At that point, remove the pan from heat.
- The best way to prepare the pads or strips is to first determine how much hot solution a strip will absorb (use a scale). Then multiply that amount by the number of strips and pour that amount over the pads or strips. This will avoid excess solution from being on the surfaces of the matrix when you apply it in the hive.
- While the solution is still hot, either (A) add twenty (20) (3½” x 8”) absorbent cellulose pads (or fifty (50) 2.5” x 15”(6.35 x 38 cm) cardboard strips) on edge into the pan and allow them to absorb the solution, or (B) place the pads into a separate plastic container and slowly and carefully pour the still-hot solution over them. With either method, you may need to use tongs to carefully turn the pads over to obtain full absorption (which must take place before the solution cools). Be careful to avoid splashing of the solution! The hot solution will be absorbed rapidly.
- Note if you are working in an area with high humidity: place an airtight cover over the the hot solution and the matrices to minimize absorption of moisture from the air, otherwise the glycerin will absorb considerable moisture. One maker suggests working in a dehumidified room.
- If all the solution does not absorb, the excess should be drained off before allowing the pads to completely cool.
- For easier handling, allow the pads to cool (sealed from the air if you are in high humidity) for at least a day before application. The oxalic acid will recrystallize during this time, and make the pads easier to handle and apply, with no dripping of solution.
- Storage: The pads can be stored in a labeled sealed container for up to 2 months, by which time the cellulose will slowly start to degrade. If exposed to of high humidity, the pads will absorb moisture and be much messier to apply. Once inserted within the cluster, they quickly absorb moisture and “wet up.”
- Checkbacks during the course of treatment: We spot-check regularly to make sure that the pads or sponges are wet on the surface, and if touched with the fingertip, have a strong sour taste. If they dry out and don’t pass the taste test, they are no longer active.
Notes on crystallization
Using maximizer lightweight pads
We get eleven (11) – 3.25″ x 7.375″ pads per Maximizer (lightweight, part number GPC 100S) sheet. We apply two pads per hive between the brood chambers.
Each pad holds ~60 g of 1:1 solution (67g fully saturated; 57 g lightly saturated for easier handling). That means ~30 g each of OA and glycerin per pad, 60 g each per hive.
Note: these pads contain a fire retardant. I can’t disclose what it is, but it’s not one that causes me concern, but may be of concern to regulatory agencies.
Other Matrices
I am continually experimenting with other matrices, limiting myself to biodegradeable ones without added chemicals.
Application
- Optimal timing of this treatment in treatment rotation is to apply the pads into the brood chamber at time of placement of the honey supers. This treatment should only be used once while colonies are rearing brood, rotating with miticides with other modes of action, such as formic acid, thymol, amitraz, or fluvalinate. An oxalic dribble or vaporization can then be used during the winter brood break.
- Wear waterproof gloves.
- Using gloved hands or tongs, apply two pads between the brood chambers, placed so as to be within the cluster (avoid placing under a top feeder where syrup may spill, or directly against pollen substitute). Placement of the pads must allow for movement of the bees over both surfaces. The pads or cardboard strips can also be hung over the top bars, inserting them spread between the two brood chambers. For cardboard strips, 3-4 will be needed per brood chamber.
- The pads or strips must be placed within the cluster. If placed where bees don’t walk over them, no distribution of acid occurs.
-
A tip from a user of the strips: use strips that do not reach fully to the bottom of the frames, so that the queen can walk around them.
- For optimal efficacy, the pads or strips must remain in the hive for 60-75 days, or until most of the acid has been distributed. After treatment, remove the pads, handling them carefully, since they will still contain acid.
- After removal, place the spent pads into a plastic bag or container for transport, and you’re your hands, hive tool, and smoker with neutralizing solution.
- Dispose of the spent pads in a landfill, or compost them.


